One of the better winters I spent as a teenager was playing the classic 1998 PlayStation game Final Fantasy Tactics and listening to Built to Spill’s There’s Nothing Wrong With Love on endless repeat. (It was things like this that led to me being voted “He Goes Here?” in my high-school yearbook.) Back at home over the holidays, finding myself reverting to teenagerhood, I had an itch to play Tactics again, because there’s nothing more life-affirming than someone in their 30s trying to re-create their youth.
Not coincidentally, I also had some time to kill. I could have put an emulator on my laptop and plugged away, but I wanted something a little more like what I remember: an old CRT screen and a wired controller. So, I decided to build a little emulator myself, using a Raspberry Pi 3. It took me about 30 minutes in total.
To back up for a second: the Raspberry Pi is a single-board, super-simple computer that can do a surprising amount. It costs $35, though that only gets you the computer itself — there’s no power supply, no onboard storage, no keyboard or mouse or way to connect to a monitor. But for $35 you get a computer with a 1.2 GHz processor and 1 GB of RAM, about the same specs as an iPhone 5 or some Chromebooks. (It’s powerful enough you could reasonably, with some work and compromises, use a Pi as your main work machine.)
Running an emulator, a program designed to let a operating system behave like another one, is actually one of the more basic things you can do with a Pi. People have strung multiple Pis together to form a supercomputer, created working weather stations with them, and sent them up in weather balloons to take photos from the edge of the Earth’s atmosphere. Emulating a PlayStation 1 on it is comparatively trivial.
Here’s everything I needed to do it.
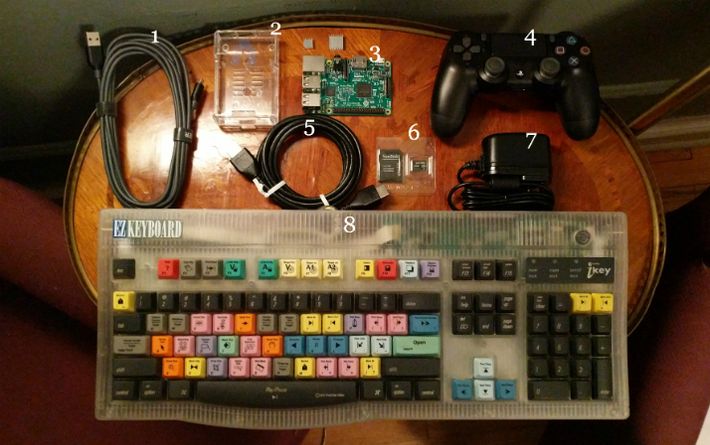
A quick rundown of what everything is, and how much it cost.
1: 10-foot Micro USB cord from Anker ($6.99), mainly so I could use a wired controller from a comfortable distance from the screen
2: SB Components Clear Case for Raspberry Pi 3 ($5.58)
3: Raspberry Pi 3 Model B Board ($35) and LoveRPi Performance Heatsink Set for Raspberry Pi 3 ($4.99)
4: PS4 DualShock Controller ($46.99). I should note I already owned one of these, and any USB controller will work here, so any Xbox 360, Xbox One, or PS3 controller will all work fine. If you don’t have any of those, these Baigeda Game Controllers are $12.49.
5. AmazonBasics 3-foot HDMI Cable ($5.99)
6. SanDisk 16GB MicroSDHC Card with Adapter ($5.95)
7. Keten Raspberry Pi 3 Power Supply ($8.99)
8. A 2001-era USB EZ Keyboard meant for FinalCut Pro that my father had in the back of a closet ($??). If you can’t lay hands on a USB keyboard, you can get this Gear Head USB keyboard for $5.99.
Not Pictured: A 19-inch Panasonic CRT TV in the guest room at my parent’s place and a MacBook Pro I used to download some software and write to the microSD card.
All in all, I spent $73.49 on everything. If I didn’t have a keyboard or game controller I could use, I would have spent $91.97. And I should say, I went about this slightly stupidly; there are bundles that include a lot of this stuff for comparable prices. This Vilros Raspberry Pi 3 Basic Starter Kit, for example, includes a Pi 3, a case, a power supply, and two heat sinks for $49.99, when I paid $54.56 for essentially the same parts. I also could have cannibalized one of the many HDMI cables I have, and just used the micro USB cord that came with my PlayStation 4 instead of buying a new one. If you have any of these things, you could easily get away with spending under $60, and maybe even just $50 for the basic starter kit if you also have a microSD card lying around.
After snapping the case around the Pi board, I hooked it up to a TV, controller, and power supply. If you’ve ever set up any video-game console or even, like, a Roku box, all of this should be second nature: The HDMI cable goes into the TV; then you hook up power supply to an outlet, and plug the controller into one of the four USB slots provided.
After that, it was time to load up an emulator. Luckily, there’s a program made for just this purpose: RetroPie. Partly a free program and partly a bundle of a lot of other emulator and controller programs already floating around, it’s remarkably easy to get set up and running, and supports emulation on over 50 systems, everything from old Amiga games to MAME, which lets you run many old arcade cabinet titles.
First download RetroPie here. Once you’ve downloaded the program, you’ll need to write it to your microSD card. If you’re using a PC, use a program like Win32DiskImager. If you’re using a Mac, use something like Apple Pi Baker. If you’re using Linux, there is no way in hell you need help doing any of this.
After that, remove the the microSD from the adapter and slot the card into your Pi (the microSD card will function essentially as your Pi’s solid-state hard drive). After a moment, you’ll see a very old-school-looking DOS screen pop up as RetroPie boots itself up. From there, you’ll have a pretty slick front-end that will do the majority of the work for you. You’ll need to map the buttons on your controller in RetroPie, and then you’ll be able to start looking around.
Next, you’ll want to plug in your USB keyboard, because the next thing you want to do is load in some ROMs. To do that, you’ll want to get the Pi’s onboard Wi-Fi up and running. Navigate the main config menu over to “Configure Wi-Fi,” and select that. You’ll need to find your Wi-Fi network and type in the password, and since there’s no default keyboard you can use with a controller setup, you’ll need a keyboard here. (You’ll want to keep the keyboard handy if you want to monkey around in more advanced settings as well.)
Once Wi-Fi is up and running, you can transfer over ROMs, which are basically the files of each individual game. Here is where I should say: ROMs are sometimes described as being in a “legal gray area,” but in reality downloading a ROM is in violation of the DMCA and existing copyright laws. Download ROMs at your own risk, and you’re gonna have to find them on your own. Best of luck.
But, if you do happen to have ROMs around, you’ll want to transfer them over. You can load them in via a USB stick, but that’s actually clunkier than just transferring them over your Wi-Fi network. To transfer files, you’ll need to use a SFTP (SSH File Transfer Protocol) program. WinSCP is the most popular option for Windows users, and on the Mac most people use Cyberduck.
Once you have those programs running, you’ll be able to set up direct file transfers to your Pi. To do this, you’ll need the Pi’s username and password. By default, the username is “pi” and the password is “raspberry” (with no quotes around either).
Whew! This may seem like a lot, but you’re pretty much at the finish line. Drop your ROM files from your computer into the correct emulator system folder (so, for instance, Nintendo games should go in the file named “nes”). You’ll see the game appear instantly, usually, though I found I had to reset RetroPie once or twice to get it to recognize a new game.
From there, scroll to the system you want to play, find the game you want to boot up, and you’re done. While this may seem like a lot of steps, in reality it’s just downloading various programs and getting them up and running. If you really get stuck, this video walks you through every step.
For me, this meant after finagling a few settings and transferring some files, I had Final Fantasy Tactics up and running, and Built to Spill playing on Spotify. On the one hand, it was a vastly different experience than what I’d done years ago — I’d bought a cheapo computer that could run thousands and thousands of games for less than what I paid for my original copy of Final Fantasy Tactics. I’d used wireless transfers to get everything up and running versus clicking in a CD and waiting for the PlayStation to whir up to its boot screen. My music was streaming over Spotify instead of playing on shuffle on a Discman. And instead of having vast washes of free time to play the game, I had about two nights before I had a flight to catch back to the real world. But for a little bit, I was back in that winter when my world was pleasantly constricted to one game, one album, and not much else.