
Every greeting card I’ve ever received lives in a box under my bed. The truth is, when times are tough, a card with a cat holding on to a branch for dear life that says “Hang in there!” can actually make me feel better. And these days, the sentiments inspired by greeting cards — whether for birthdays, anniversaries, holidays, or just to say hello — are even more appreciated as many of us still are (or feel) disconnected from one another due to the pandemic. Like many people, I saw our socially distant times as an opportunity to connect with loved ones this old-fashioned way, with a physical card and a pen. But the more I looked for greeting cards, the harder it became to find the right ones.
The best greeting cards speak to a recipient’s identity and personality, but I couldn’t find a lot that are inclusive to all ethnicities, cultures, or people with disabilities. As someone who’s never shied away from an arts-and-crafts project — I studied and work in the visual arts — I figured I could learn to make my own greeting cards the way other folks are learning to make candles or ceramics or pressed flowers or needlepoint. (I’m not talking about those clip-art cards your grandma used to make for every birthday, either; you can see some I’ve made in my Etsy shop, The Sticker Bodega.) But what I didn’t know (yet) were the best tools for the job. Between paper and printers and other gadgets, there are countless supplies you can use to make cards and things to decorate them with, with very little information about what stuff works well together. The only way to find out, I reasoned: Try as much of it as possible. And that I did, diving deep into the different types of paper, printers, and cutting machines I could use to make professional-looking greeting cards at home.
Below, you’ll find my favorite cardstocks and sticker paper for most any greeting-card project. When it comes to cutting machines and printers, my time testing supplies taught me that some are best for beginners, while others are suited for more experienced crafters. So, beneath my favorite papers, I have outlined two different greeting-card projects I recently completed (beginner and advanced), noting the machines and other smaller tools (paper trimmers, glue runners) I used for each. This way, you can better determine what supplies sound right for you.
Before I get to the supplies, though, I want to talk a little about my process. First, I suggest any aspiring card-makers — especially true beginners — check out the YouTube tutorials from Elan Creative Co., It’s Me, JD, and Nasayi that I watched (and still return to). Being an artist myself, I usually begin any project with a quick hand-drawn sketch of what I want my card to look like. Once I have the general idea, I’ll sometimes use Adobe Photoshop to design any decorative elements like stickers. If you don’t have Photoshop or don’t want to pay $10 a month to run it on your computer, I suggest checking out the free service Krita, which has many of the same design features as Photoshop, including tons of preloaded, customizable brushes you can use to make your drawings look more unique. After I complete a card’s design, I print and cut everything. I’ll use a cutting machine first to cut out the base layer of a card and score it in the middle, so it can easily fold. If I am making something more elaborate, I’ll use a printer to print embellishments like stickers or illustrations, cut around their borders with a cutting machine, and attach them to the base. I usually have my original sketches close by so I can compare them to the final product as I go.
My favorite paper for making greeting cards
Cardstock for card bases and accent layers


Whether I’m making something basic or advanced, I always start with a cardstock base. The best base cardstocks weigh between 80–110 pounds. (To the unfamiliar, cardstocks are often described by their weight; an 80-pound cardstock means that 500 sheets of that paper weigh 80 pounds.) I often use one of these white cardstocks from Neenah as a base. Whether I am combining it with another (colorful) cardstock or stickers, the white helps whatever it is pop. The Classic Crest has a smoother finish, while the Classic Linen has more texture.
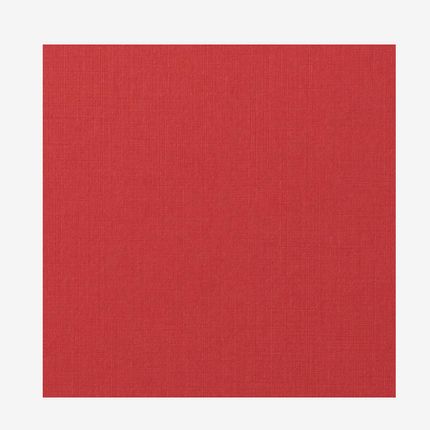
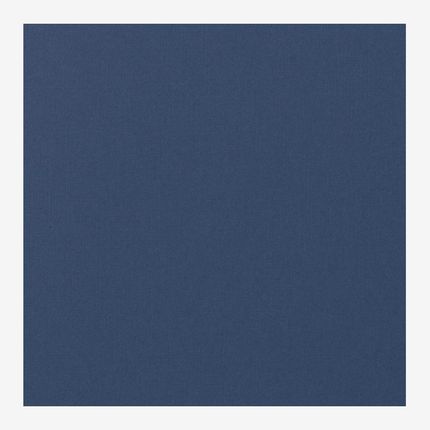
As you’ll see in some of the greeting cards I made, you can combine a base of white cardstock with an accent layer of color cardstock to create a stenciled effect with words and images. I like the colorful cardstocks from Paper and More, not least because you can get envelopes to match most. There are tons more shades to choose from in addition to this navy Blue Blazer and bright Red Pepper, both of which have a textured linen finish. You can, of course, use colorful cardstock as a base, too. Whether it’s a base or accent layer, I’d again recommend using colorful cardstocks that weigh between 80–110 pounds.
Cardstock for embellishments


Advanced card-makers may also want to use cardstocks to make designs or shapes they stick on to their card’s base to embellish it; for that, I recommend something lighter, like a 60- or 65-pound cardstock in any finish. For something matte, you could try the pack of colorful cardstocks from Neenah; for more texture, consider something like Paper and More’s Antique Gold parchment paper. To attach extra cardstock embellishments, I’ll use runner tape.
Sticker paper for embellishments
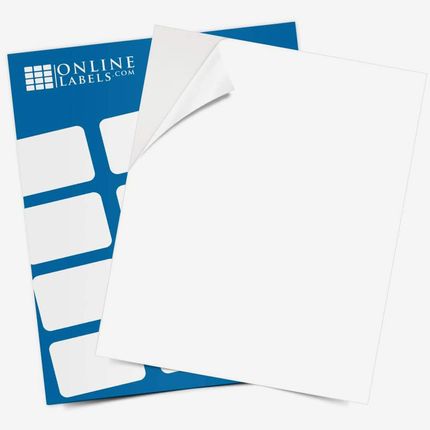

Making stickers to embellish a card is also more of an advanced technique, too. But to anyone who likes the sound of it, I like to use sticker paper from Online Labels. The gloss will give the stickers a shinier look; the matte, a more muted effect. Printing stickers on these full sheets makes it easy to use a cutting machine to create both kiss-cut stickers (with a border around their design) and die-cut stickers (no border).


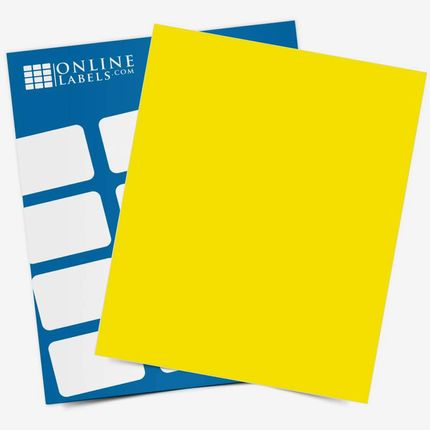
Online Labels also sells full sheets of colorful sticker paper (like these blue, green, and yellow sets), should you want to experiment with printing a sticker design on something other than white paper.
The tools I use for simple (but not basic) cards
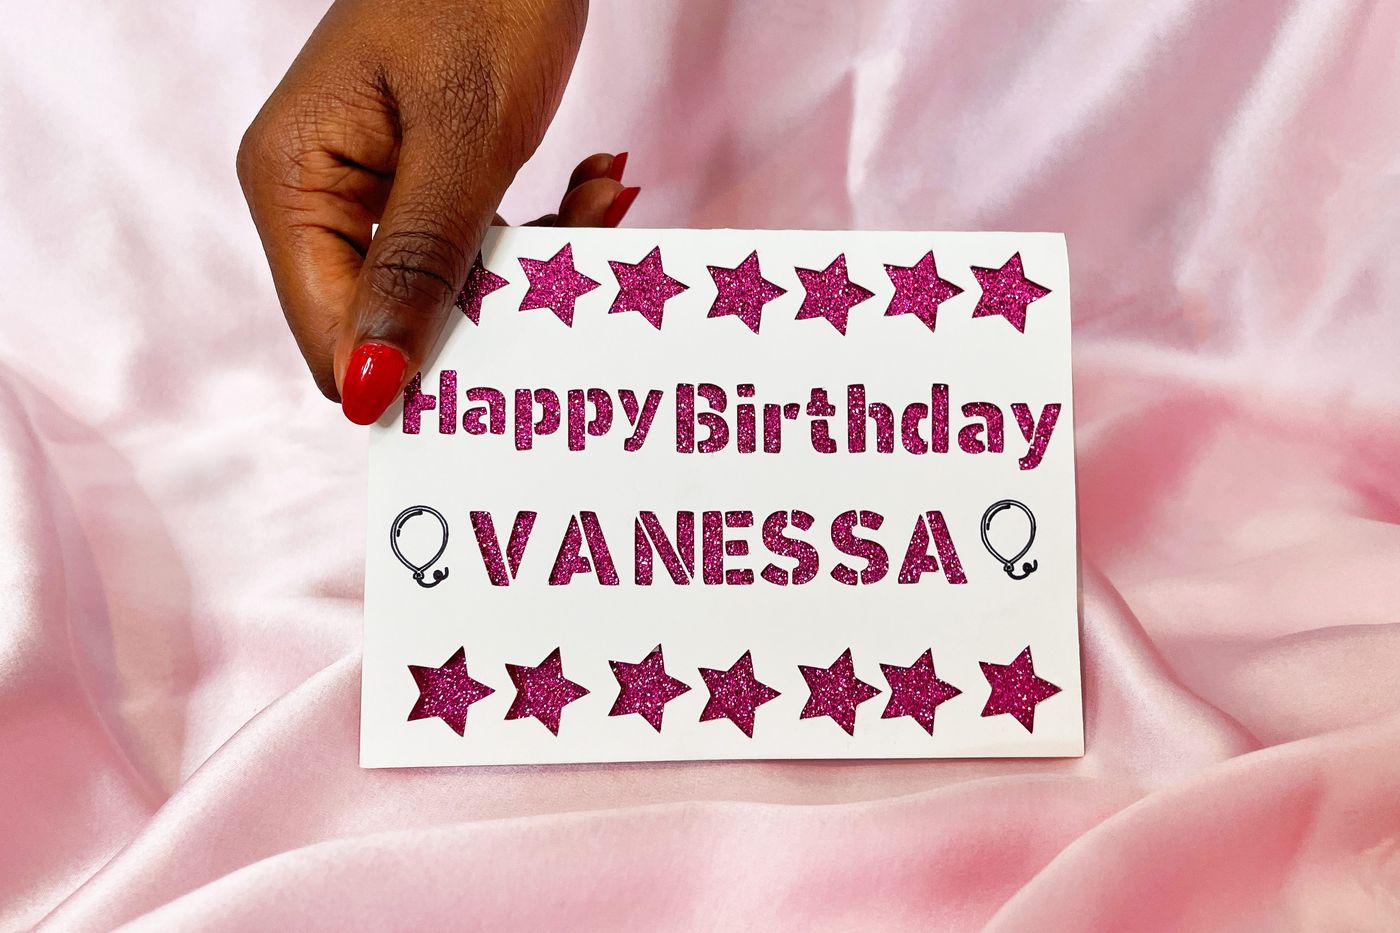
The birthday card shown here, which I made for my sister, is one of the simpler styles of cards I’ve created. It is essentially two pieces of cardstock (a white base and a colorful accent layer) glued together with an adhesive runner. All of the detail work was done on the Cricut Joy — a small and mighty cutting machine — but I used the machine’s compatible card mat and pens, too. I like the card mat because it’s designed with templates to make three different sizes of cards; it is also sticky, so it holds paper in place as the machine is cutting it or drawing on it. This stickiness wears off, though, so you will have to replace a mat eventually. To cut the cardstock to size, I use a paper trimmer, because you get straighter lines than if you use scissors (but you can use those, too).


While the card’s letters and little balloon drawings might look like a lot of work, they’re really not when you use Cricut Design Space, free software you can download on your computer or phone and use with the Joy machine. It includes tons of fonts and graphics (like the balloons on the front of this card) that the machine can cut or draw with one of its pens. The software has prompts for you to enter the type of cardstock you’re using — 80-pound is considered “medium” cardstock — and a selection of stencil fonts (I used DIN Stencil Heavy here). Once you choose your font and desired words, the machine will cut out the letters itself; the software also lets you note the dimensions of the card you’re creating, and where you’d like any design elements, so you can ensure everything is properly aligned. To draw the balloons, I just chose that graphic in the software, stuck one of the Cricut pens in the Joy’s penholder, and let the machine do the rest. (You can also have the machine write messages on the inside of a card more or less the same way, and there are lots more pens and markers it can use.) Once I had the words cut and graphics drawn, I cut my accent color cardstock to size and glued it behind the white base layer with an adhesive runner.
The tools I use for more intricate cards
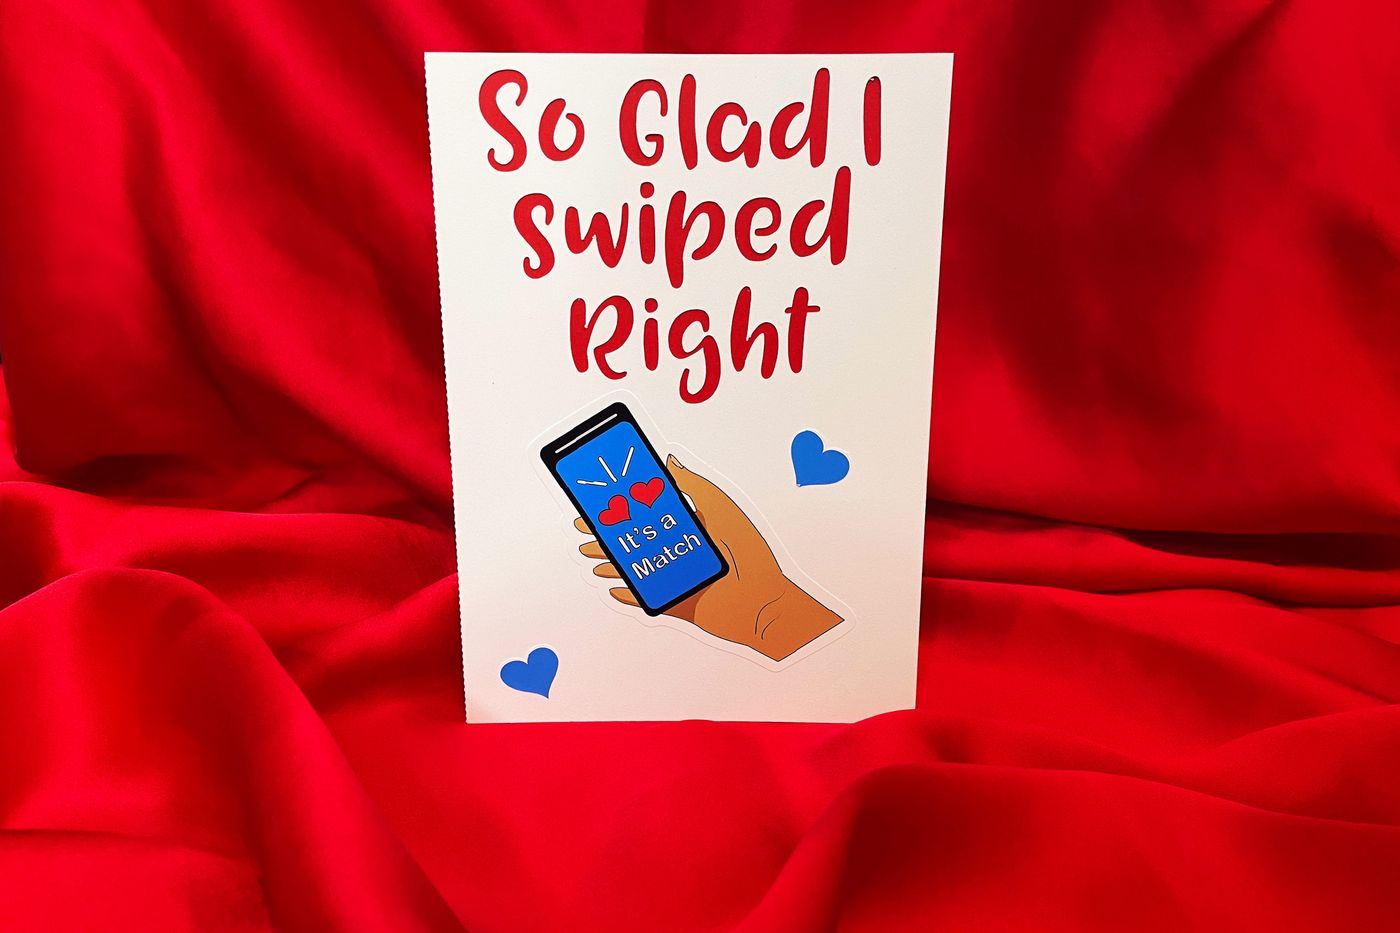
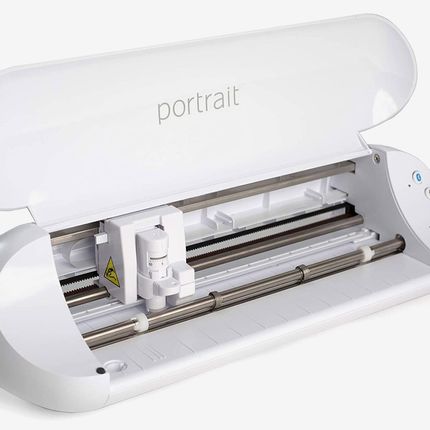
This card, which I made for my friend’s husband (they met on a dating app), is a bit more advanced: It incorporates stickers I made (the hand holding the phone, the blue hearts), in addition to a cardstock base and accent layer (white and red). The Cricut Joy can’t cut sticker paper, so if you’re going to make a card with stickers, I’d recommend the Silhouette Portrait 3, a cutting machine that can do everything a Joy can and more. Making stickers also requires a printer — my two favorites are the HP Tango printer below (better for glossy stickers) and the more expensive Canon PIXMA TS9520 (better for matte stickers), either of which can obviously be used for things beyond sticker-making. (And most people won’t need both! But the detail-obsessed, like me, might appreciate knowing each printer’s strength.) Like the Joy, the Portrait 3 also has compatible cutting mats and pens that I’d recommend using for the same reasons I recommended them to Joy users. And I’d again suggest using a paper trimmer and an adhesive runner, since cards like these also require some precise cutting and assembly.

Should you invest in this printer, I highly recommend taking advantage of HP’s subscription Instant Ink service to help keep ink costs down.


There are Silhouette-compatible pens in lots more colors, too.
I drew the phone-in-hand image myself in Photoshop, printed it out on glossy sticker paper, then imported the design to the Portrait 3 so that I could use the machine to properly cut it. The Portrait 3 also has compatible design software (the basic edition is free) with its own stenciled fonts and graphics that it can cut out or draw with a compatible pen. But, unlike with the Joy, you can use that software to make your own illustrations that could become stickers, too (there are tons of tutorial videos that show you how). The heart stickers on this card, for instance, were designed using a preset tool in the cutting machine’s software. Because you can pair the Portrait 3 to whatever printer you have at home, it’s super easy to print any illustrations designed on it — and any graphics designed on the cutting machine won’t need to be imported to it when it comes time to cut them to size. (If, say, you wanted to make cardstock embellishments instead of stickers, you could follow this same process: Design them on the machine and print them using the lighter-weight cardstock I recommend.) Like the Joy, the Portrait’s software makes it easy to note the dimensions of your card and then arrange its elements to fit before it gets to work scoring, cutting out stenciled letters (I used the Awery font for this card), and what have you. After cutting out the card’s words, I assembled my already cut stickers around it and then used the glue runner to affix the red accent cardstock behind the white base.
The Strategist is designed to surface the most useful, expert recommendations for things to buy across the vast e-commerce landscape. Some of our latest conquests include the best acne treatments, rolling luggage, pillows for side sleepers, natural anxiety remedies, and bath towels. We update links when possible, but note that deals can expire and all prices are subject to change.


